
I have been wanting to make cake pops for ages. If you haven't heard of cake pops, they are intricately decorated small balls of cake, stuck on the end of a stick like lollipops. Just google cake pop images. You will go absolutely crazy. Or look for cake pop boards on Pinterest. That kept me busy for the better part of a whole day. A while ago, I bought a large set of mixed baking stuff, which included, among many other things, a cake pop mould which bakes round small cakes for cake pops. Then there is the alternative way of making them, by first baking a regular cake, shredding it into crumbles and adding cream cheese or frosting to make a mouldable paste and form balls (or any other shapes for that matter) from the paste.
I spent a lot of my Wednesday in my cake pop frenzy, cheekily googling and Pinteresting (yes, I'm sure it can be used as a verb) cake pops and letting my mind jump from one crazy plan to another. I also didn't have any Candy Melts, and had no idea where to get them. Luckily my trusted baking consultant knew a place which was open until late, so I ended up walking several on my hunt for Candy melts on Thursday evening late after my pilates. And then staying up even later making cake pops, and multitasking that with packing for my work trip. And then there was of course cleaning up the rather horrifying mess in the kitchen. After midnight. Getting into bed really late on a Thursday night is not very good given that my alarm clock goes off at 5.40 am for bootcamp on Friday morning. But what I wouldn't be prepared to do when baking inspiration kicks in. And yes thank you, I know. I'm insane.
In my pop-planning frenzy I was faced with one more dilemma. My magically shrunk jeans are still skintight on me, so I'm reallyreallyreally trying to be good with my eating. So I thought, why not make healthier cake pops! There are loads of healthy(ish) date and nut bar or ball recipes online, just pick your favourite. I chose one for date and cashew bars from Minimalist baker which I ran into a while ago on Pinterest, and pinned on my board "Healthy-ish treats".

Date and nut pops (makes about 10):
100g dried dates
50 g sultanas
25 g macadamia nuts
25 g Brazil nuts
A few pistachios (about 20)
35 g dark chocolate chips
For finishing:
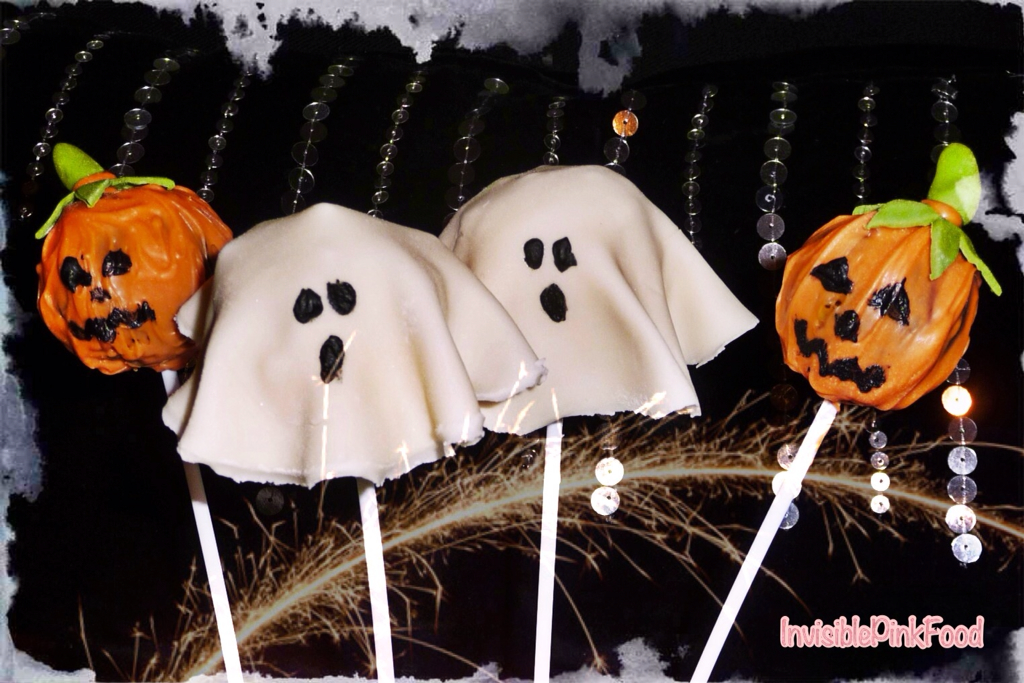
For the gosts: White candy melts and white fondant icing, black food colouring
For the pumpkins: orange candy melts, green and black food colouring
The howto:
Pulse nuts in a blender until fine. Add dates and sultanas, pulse until smooth. I then mixed in the chocolate, but the big-ish pieces of chocolate made it difficult to roll the dough into balls, so I would add the chips and give it a few more pulses with the blender. You should end up with a crumbly but sticky dough which is easy to roll into balls. Note that the date dough is quite a bit heavier than normal cake pops, so don't make the pops too big or they will slide off the sticks or bend them. Refrigerate the pops for at least an hour.
Melt a few candy melts (orange for pumpkins, white for ghosts), dip the bottom of the pops and the stick in the candy melts. Place the pop onto the stick, and make sure there is a seal of candy melts between the pop and stick as that will (at least in theory) keep them attached. Then, in theory go on to dip the balls in the candy melt goo. In practice, this is where I ran into trouble. The candy melts were way too thick for dipping. So I scooped it on the pops with a spoon, leaving the horrible uneven surface you see in the pics. My baking guru later informed me that you can thin the candy melts with vegetable oil if they are too thick to ease the dipping.
For the ghosts, roll out fondant icing, use a round cutter to make circles and place on top of the white pops. For the pumpkins, colour a bit of fondant green. Use a flower cutter to cut out the green tops and make a stem out of green fondant, glue them on using candy melts. Colour a bit of the white candy melts black, and paint on eyes and mouths. Note that for colouring candy melts, you need a oil based colour. However, I used normal colour paste, which I mixed with a very small amount of vegetable oil, and that seemed to do the trick.
The verdict:
All the blogs and YouTube videos I have watched about cake pops make it look so easy. Well, maybe I'm just hopeless in the kitchen, but I actually found things quite hard. Especially the candy melts, which I had imagined would melt into the right consistency. Well, it doesn't. It melts into a really thick goo. And I had no idea what the right consistency is, or what you use to dilute it. My baking guru later told me to use vegetable oil. Which makes sense. So next time I'm hoping I will be more successful in producing smooth and beautiful cake pops, instead of these horrible ones which look like they were made by a three year old. Also, I need to rethink what to use to paint the eyes and mouth, as the coloured candy melts are too thick to paint with.
The purpose of this post is not to scare you off cake pops. I'm sure it's not as hard as it was for me. However, if you have never made any before, do a practice round before making them for a special occasion, just to make sure all systems are fully operational. I can't wait to try again, as I stocked up on candy melts. I have a few Xmas designs I want to try out, so maybe closer to Holiday season I'll give it another try.
After all the negatives, I want to end on a positive note. The taste! The date and nut balls were absolutely delicious. I'm never ever buying another Nakd bar again, I'm most certainly making my own ones from now on. The dates form the basis of the gooey paste, and then you can add pretty much anything you like. Nuts, dried fruit, choc chips or fudge bites... Maybe a bit of nut butter as well. Next time I might try to make them in my heart-shaped chocolate moulds to get cute little heart shaped snacks instead of the ugliest cake pops ever.
No comments:
Post a Comment