Monday 21 July 2014

Garden update


This time the garden update is a flower update. If you are following the blog on Facebook you know I bought "a few" flowers the other day as I got tired of the complete lack of flowers in our flower beds. I was going to leave all flower related garden issues to worry about next year, but I decided to just bite the bullet and get on top of it all now. The sooner it's done, the sooner there will be colourful flowers in the garden. I tried to buy flowers that wouldn't grow much higher than the little brick wall behind them, as behind the wall are just open fields and winds often get very strong and tend to blow over anything that is growing in the flower beds. I also tried to find anything that said "hardy" on the label as I got a bit of a reputation for not being very good at keeping plants alive.

The actual planting process was rather painful as whatever old flowers were left had clearly been in there for ages and developed roots that reached all the way to China. It would have been ok if I could just have dug everything up. But there are clusters of daffodil bulbs in there, so I didn't want to overhaul everything out of fear of damaging the bulbs. So clearing up the flower beds and making them ready for the new inhabitants took quite a while. It took three days from the time I got home from work to evening dusk to get it all in place, and now I'm hoping that I will be able to keep it all alive through the summer and hopefully next year the flowerbeds will require much less upkeep.


Before.
After.


Dahlias in bright colours

Fuchsia
I love the colour of both the flowers and foliage on this dragon flower.
Some lilies, both in pink and yellow. Sadly the beautiful flowers got smashed up in the rain storm.

I couldn't resist getting another hydrangea as the one we already have seems to like it here.
I bought a pink lavender to complement the blue one we already have.
Elsewhere in the garden there is also a bit of flowering going on:
The funny little succulent that grows under the pink hydrangea is producing these lovely pale pink flowers.

The honeysuckle is staring to get a bit old and woody and may need to be completely cut down but I will worry about that in the fall.
The oregano flowers are beautiful and there is plenty of them.
I don't know what this funny little thing is, but it's probably a weed as it's ubiquitous in the garden.
Although the damn birds have eaten most of our fruit off the trees there are still a few apricots in the tree and we hope we get to taste one this year as last year there were none left to taste.
The pears are coming along well, but there is still months to go...


Saturday 19 July 2014

Salted caramel


How do I know it's been a good week? I have made salted caramel twice in the last 7 days. Oh and it's also the first day of part 2 of my summer holiday, I'm not due back in the office until July 28th so there is a glorious 9 days of leisure in my immediate future. It remains to see how leisurely it will be as we are off to my Sis' graduation on Monday and after that the parental unit are coming to stay at ours for a few nights with some heavy sight seeing scheduled for the rest of the week. So if it's a bit more quiet on the blog front, it's because I'm making sure my parents see as much of Cambridgeshire and possibly more while they are here. 

But back to the main thing, salted caramel. I have tried not one, but two salted caramel recipes to bring you the best of the salted caramel world. And yes, I do have a favourite of the two, but more about that later.

So lets talk salted caramel. Salted caramel goes perfectly with apple. Or ice cream. Or cookies. Or cake. Or simply with a spoon, scooping it right out of the jar (or just straight from the saucepan, who the heck needs jars anyways). All the blogs say it's so easy to make at home, that you have no excuse to ever buy store bought  again. I was very sceptical. And I was wrong. It really IS that easy. All you need to do is to try it once, and you will know that you will always have delicious salted caramel at your fingertips as long as you have sugar, cream, vanilla and salt. Considering the speed at which this sauce disappeared from my fridge, I'm not sure this is a good thing.

The first recipe is from Sally's Baking Addiction and the second recipe is from Country Cleaver. I have not added many step by step photos as there are really good tutorials in the original recipes if you aren't sure what to do or what it's supposed to look like. Just rest assured you don't need to be an expert cook to do this. Cooking with sugar is always a bit intimidating, but as long as you don't burn it you will be ok. And you will know if you burned it, there is a very bitter smell to burned sugar, and next time you know not to cook the sugar for quite as long.

Salted caramel method 1
1 cup (200 g) sugar
6 tbsp (90 g) salted butter cut into 6 cubes
1/2 cup (120 ml) double cream
1 tsp salt

Melt sugar in a saucepan over medium heat until liquid and amber brown. When the sugar is completely melted, add the butter. Be careful as the sugar liquid will bubble when you add the butter. Stir until the butter has melted completely, about 2-3 minutes. Slowly add the cream, stirring constantly. Be careful as the liquid will bubble very rapidly and may splatter. Let cook for another minute. Take the saucepan off the hob, add salt and let cool. 


Salted caramel method 2
1 cup (200 g sugar)
1/2 cup water
3/4 cup (180 ml) double cream
1 tsp vanilla
1/8-1/4 tsp salt

Add sugar and water in a saucepan and bring to a boil on medium heat. Cover with a lid and let boil until an amber brown colour (see the original post for step by step pictures).  The original recipe said this will take 5-8 minutes, for me it took much longer maybe because I was using a lower temperature, but I got there after about 12 minutes. Resist the temptation to stir the mixture while it's cooking as this may cause the mix to crystallise. When the colour is right, slowly pour in the cream while mixing constantly. The mixture will bubble heavily and may splatter. Let cook for another minute or two and take off the heat. Add vanilla and salt and let cool. 


The verdict:
Both recipes resulted in a very delicious salted caramel sauce. However, the first one turned our rather lumpy, so I had to sieve it to get a smooth sauce. Also, I feel like I couldn't get the butter to mix completely with the sugar. So my preferred method for any future salted caramel needs is definitely method 2. It is so simple and practically fool proof. The only place where you can go wrong is if you burn the sugar, but you will smell it if you done it. Just make sure the sugar turns amber but not dark brown. 

Not cooked for long enough yet, only slightly golden.
Sugar has turned deep amber and now is the time to add the cream.
Also be careful when you add the cream, the mixture will bubble up quite a bit. First tip, use a large enough saucepan. Second tip, use an oven glove on the hand you are mixing with, like my cool piggy oven mitt.


As you can see, the two recipes have a very different amount of salt in them. I would go on the side of caution and add salt a little bit at a time, starting from about 1/4 tsp and tasting your way to your desired level. I personally prefer sea salt as I like the bigger bits of salt in the sauce, but if you don't you can use regular table salt. You can store the sauce in a sealed jar in the fridge for up to two weeks, but there is no way it will stay there for that long if you are anything like me. It is not as runny as store bought sauce, so you need to bring it to room temperature or quickly warm it up in the microwave a bit to be able to drizzle it. I ended up just scooping it onto a spoon from the jar in the fridge and sucking on it like a lollipop. 


Monday 14 July 2014

Tarragon chicken


I have quite a bit of tarragon growing in the garden. Not planted by me, just leftovers from the previous owners. Last year I didn't use the tarragon at all and this year I decided I have to try and use it for something. To be quite honest, I wasn't quite sure what the heck tarragon was. I had to look what it translates to in Finnish (it's rakuuna by the way) as I thought that might help me figure it out. It didn't as I realised I've never used it for anything. So I had to google what I could do with it, and one of the recipes that came up was tarragon chicken. We are very fond of chicken in this house, which you probably are in no doubt of if you have been following my blog. So feeling adventurous I decided to give tarragon chicken a try.

According to Wikipedia, the source of all knowledge and wisdom, tarragon is an important part of French cuisine and it's particularly suitable for chicken, fish and egg dishes. It's part of BĂ©arnaise sauce. Apparently it's also a part of a popular green soft drink in Azerbaijan, Armenia and Georgia.

I used this recipe by Nigella Lawson. It sounded straight forward and easy and didn't include any weird ingredients (although I have to admit I didn't have any vermouth in the house so I thought this is a good excuse to acquire some). I made some small changes to the recipe as I didn't have any freeze dried tarragon and I doubled the recipe as I had four chicken breasts to cook.

Tarragon chicken (serves 4):
2 tbsp olive oil
1 clove of garlic finely chopped
4 scallions
1 tsp finely chopped fresh tarragon
4 chicken breasts
2/3 cups of vermouth (and maybe then some...)
1 cup (250 ml) double cream
salt and black pepper to taste
3 tsp chopped fresh tarragon

The howto:
Heat the olive oil to medium heat in a large frying pan that has a lid. Add the garlic, scallions and tarragon. Cook for a minute while stirring. Add the chicken breasts curved side down and cook for 5 minutes. Scrape the scallions and remove from the pan if they start to burn. Turn the chicken breasts over and add the vermouth. Reduce heat and let simmer gently for 10 minutes with the lid on. Check that the chicken is cooked by cutting through in the thickest part of the fillet. If not, let simmer for a few more minutes. Remove chicken breasts from the pan, and add the cream. Bring to a boil, making sure to scrape any bits and pieces which may have gotten stuck to the pan. Add the tarragon and add salt and pepper to taste. Pour the sauce over the chicken and serve with potatoes and veg.

The verdict:
I have to admit, I can't say I'm a huge fan of tarragon after trying this recipe. I'm not saying it's bad, it just had nothing on, for example, this amazing sun dried tomato chicken recipe I tried a while ago. But the Culinary Consultant liked it and said he wouldn't mind having it again. So maybe there is use for our tarragon after all.

Saturday 12 July 2014

Cape Verde holiday - part two

This is part two of my random musings and pictures from my holiday on the island of Sal in Cape Verde. You can find part one here.


After doing a tour of the island, one of the most striking things that hit me when I left my little oasis of an resort is how suddenly I was transformed from the not-in-the-most-rich-layers of society back home, to being filthy rich. The average monthly salary on Cape Verde is around €100 and many people especially around the capital live in shanty towns with huts made from cardboard boxes and random leftover bits and pieces. There is lots of Senegalese immigrants trying to make a living by selling mass produced "souvenirs" to tourists. If you want to buy local souvenirs, it's worth asking your tour guide. We were taken to a small local souvenir shop where all the produce was locally hand made (and you could see the artist chipping away on his coconut as we were perusing the shop). There is also a souvenir market in Santa Maria that sells only local products, which mostly consist of items made of coconut and some salt and liqueurs. As I said in my previous post, the island is dry and resembling a desert, so not much grows here. Apparently if the rain season is good, it's possible to grow crops like corn, watermelons and papayas, but the last good rain season was in 2010, so everything has to be imported to the island.


After seeing the local standard of life, you feel rather privileged to be able to fly across the world to this little island to lie on the beach and listen to the waves. It was also hard to see all the stray cats and dogs, coming to beg for food, looking rather scruffy and malnourished. A lot of people live in houses with no running water, and the government is building housing for the poorest inhabitants at affordable prices to hopefully eradicate the groups of huts in the shanty towns.

The Riu resort where we stayed. It's the biggest resort on the island, located a walking distance from Santa Maria and right on the beach.

There wasn't too much of a chance to get a feel for the local cuisine as our stay was all inclusive. The hotel had a buffet breakfast, lunch and dinner which was very extensive and adequate but in no way impressive. There was fresh fruit and fresh grilled fish every day which were good. There are also three speciality restaurants at the hotel, an Asian, a Cape Verdean, a grill and an African restaurant. The grill and Asian buffets were rather underwhelming whereas the Cape Verdean and African buffets were a bit better.

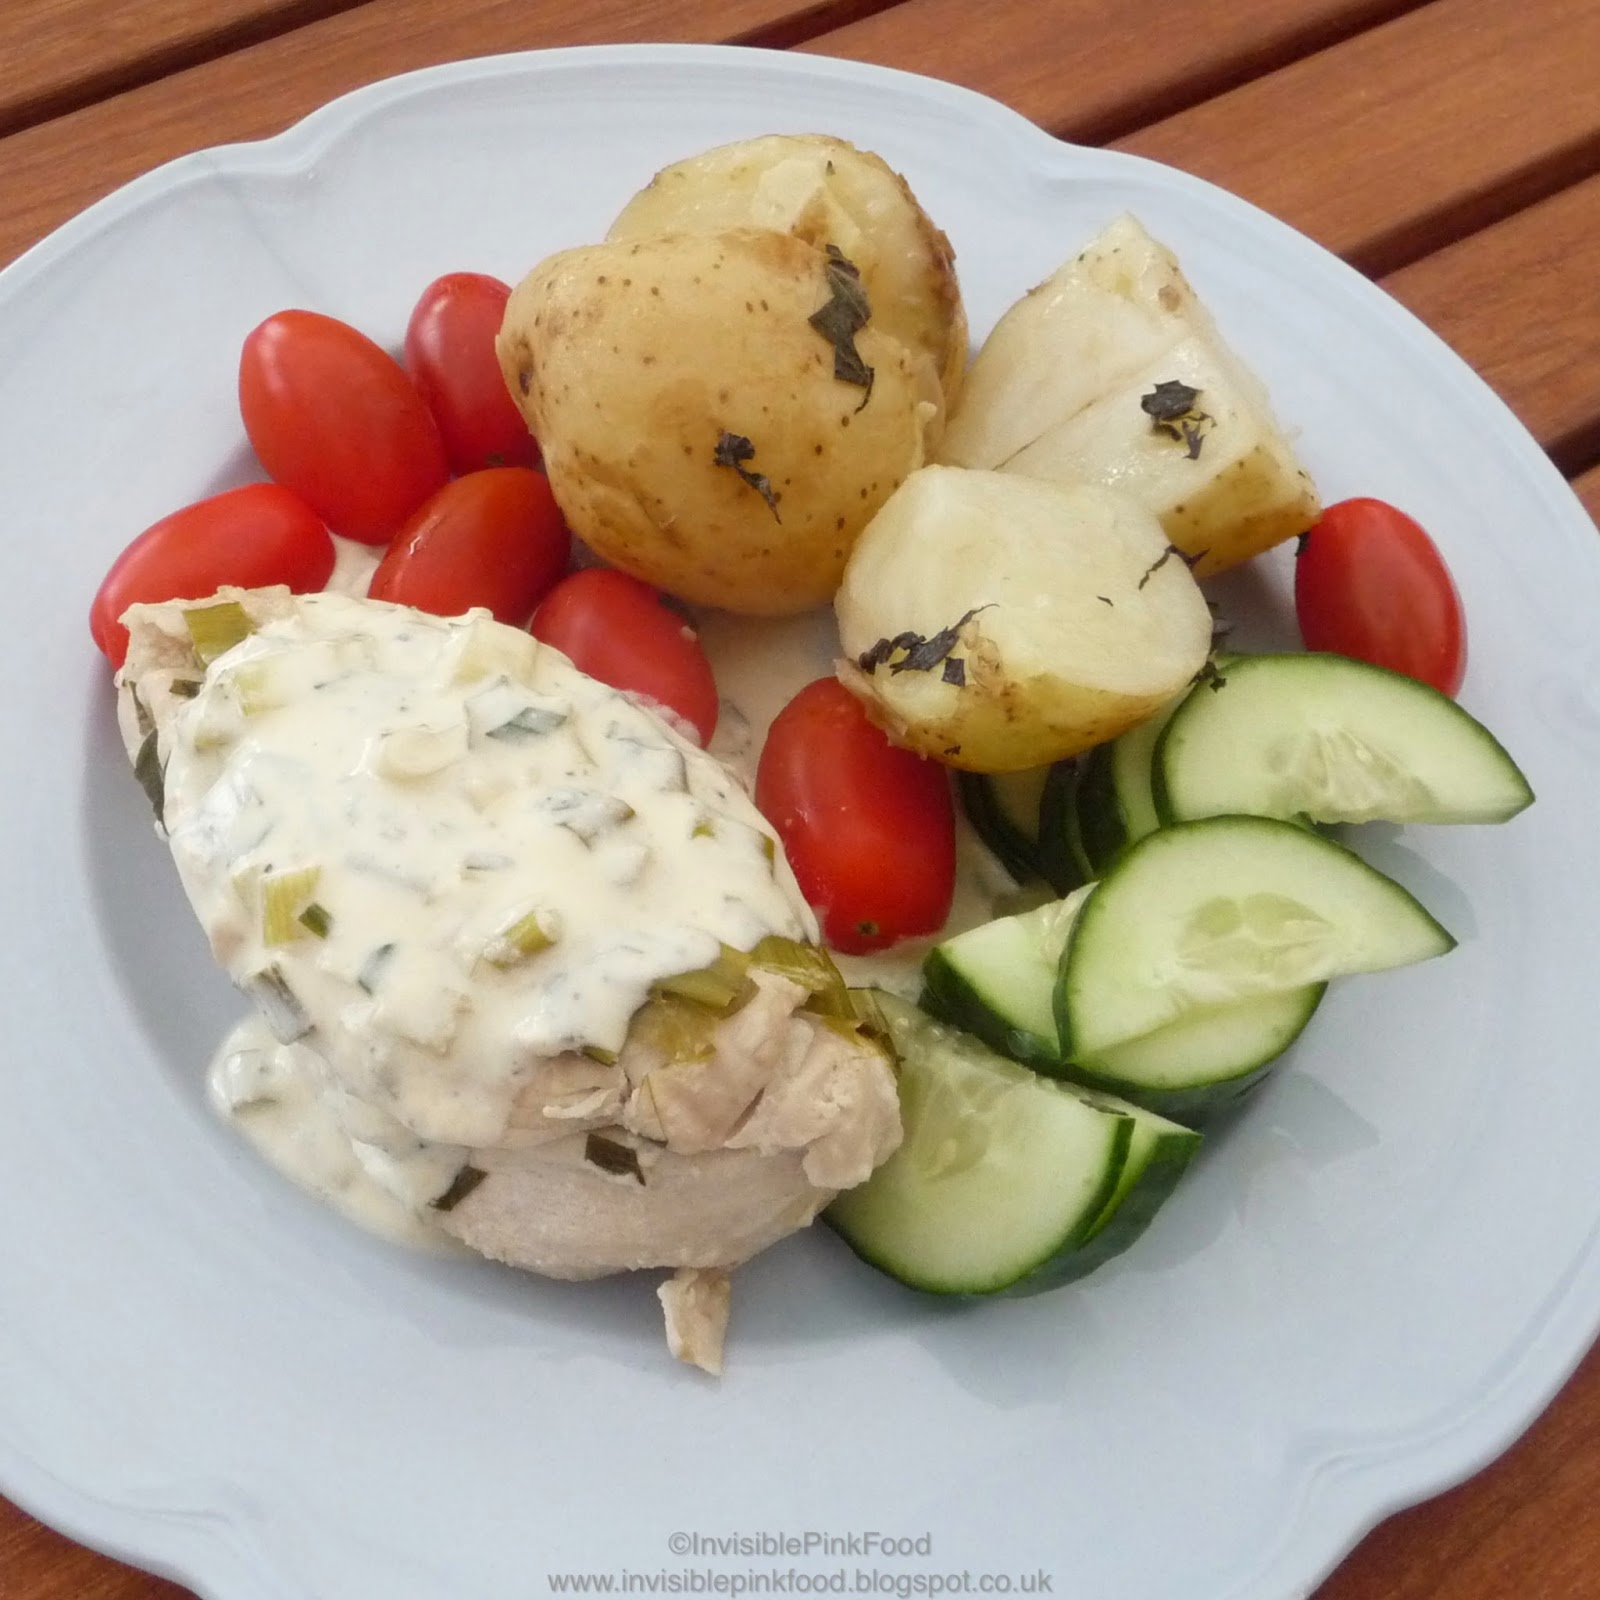
The seafood mixed grill in the Cape Verdean restaurant.
Not surprisingly, the main food in Cape Verde is fish and seafood. The local fishermen go out in tiny little boats and load their catch of the day onto a truck which drives from the fishing village of Palmeira to the capital and sells the fish off the truck. Depending on the day you can get 2-5 fish for €1. When we were visiting Palmeira there was a big (our guid said approximately 150 kg) swordfish on the docks with the local youngsters chopping off the head and gutting the fish right there on the pier. Although the catch of the day looked huge to us, we were told they catch fish up to 400 kg. 

Catch of the day in Palmeira.


The houses in the fishing village of Palmeira are painted in bright colours.

In Santa Maria the local fish market takes place on the pier and fresh fish comes in between 10 and 12 am. Fish is wheeled around town in wheelbarrows and sold that way too. 

A stall at the local fish market in Santa Maria.

We did a walking tour of the town of Santa Maria which was led by the travel agency guide. The walk from the hotel in to town was around 20 minutes, but much more than the walk in, we enjoyed our private little walk back to the hotel along the beach which took over an hour and takes you around the most southern peak of the island with no other sounds than the thundering roar of the sea in you ears and the feeling of wet sand between your toes.


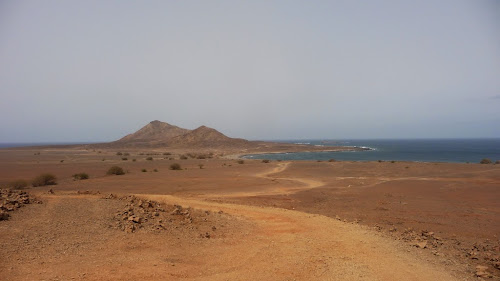
The most southern peak of the island.

One of the stops on our tour was a children's after school project called Castelos do Sal. Children in Cape Verde only go to school for half a day, and as tourism started to build up on the island about 10 years ago, many children took to begging on the streets instead of going to school. The project provides afternoon activities for children to help their education, teach them life skills and simply keep them off the streets. Kids get a nutritious meal every day, clean clothes and a place to shower as many of them come from the poorest families who don't have showers at home. They take any donations you might have such as pens, paper, kids clothes, toiletries and of course money so if you ever travel here, you can bring your donations with you straight to the charity and be assured they really end up where they are needed.

Another thing our guide told us is that although government health care is more or less affordable, medication is very expensive and often too expensive for the locals. So if you happen to bring any medicines with you, like pain killers or any other medical supplies such as band aids you can leave them to your travel guide at the end of the holiday and they will give them to the local church charities to be given to those who need it. Luckily my dear medical doctor sister had prepared well for our trip with multiple antibiotics, paracetamol and other medicines, so we left behind a big bag of medical supplies.

All in all, we had a lovely holiday enjoying the sea, sun and trying out some watersports. The temperature was very pleasant, although the air is hot there is always a breeze (which sometimes escalates to quite a strong wind resulting in huge waves in the sea and blowing around the sand on the beach so that it feels like needles on your legs). We were a bit careful with food, only eating at the hotel and loading up on probiotics all through the holiday and had no problems, but the word on the street is that you easily contract traveller's ailments, often something to do with the digestive system if you catch my drift. The most sensible things you can bring is a wide brimmed hat and some sandals that don't mind getting wet. A cardigan for the evenings. And most importantly lots and lots of waterproof sun cream and a Kindle or good books.


Wednesday 9 July 2014

Onion and bacon pie


Between all of these travel and gardening posts, I haven't forgotten that I'm pretending to write a food blog. So I thought posting a recipe every once in a while would be a great idea? This is nothing revolutionary or even fancy, but it is delicious, easy and quick. Perfect for a potluck, BBQ table or nibble on the side as well as for a lunch or dinner on it's own or with a fresh salad. The ingredients are all staple basics (yes, of course bacon is considered a basic food item which should always be around, if not in the fridge, at least a few leftover slices in the freezer).

I might have posted something similar in the past, I can't remember. I was inspired by this post on  I Heart Baking, but it only had a link to a recipe, not the recipe itself. And the link led to a site that was behind a paywall, so I decided I can make up my own recipe thank you very much.

Onion and bacon pie (serves 6-8):
2 tbsp olive oil
4 thick slices of smoked bacon
4-5 large onions
2/3 cup double cream
2/3 cup milk
3 eggs
1/2 tsp dried thyme
1 tsp whole-grain mustard
1 tsp garlic paste
black pepper
75 g cheddar, finely grated
1 shortcrust pastry (I made the most amazing shortcrust pastry the other day, recipe will follow)

The howto:
Chop the bacon, and cook until done over medium heat in one tbsp olive oil. Remove bacon from the pan. Finely slice the onions. Cook over medium heat in one tbsp olive oil until soft. I like to leave in all that wonderful bacon fat in the pan when cooking the onions for extra flavour. If you are patient enough, caramelise the onions slowly. Remove onions from the pan when cooked.

Preheat oven to 225 degrees C. In a large bowl, mix the cream, milk, eggs and spices. Add about half of the cheese, the bacon and the onions and mix. Line a pie tin with the shortcrust pastry (I use a silicon pie mould, so I don't butter it, but if you use another type of tin, it might be worth buttering it to ensure you will be able to remove the pie when done). Pour the filling into the pie mould and sprinkle remaining cheese on top. Bake for about 45-50 minutes, until the pie is golden and bubbling and not too wobbly in the middle.

The verdict:
Onions. And bacon. Do I need to say more? This type of pie usually disappears so quickly from the fridge that if I didn't have the pictures to prove it, I wouldn't have believed it existed in the first place.

Monday 7 July 2014

Garden update

It's been a few weeks again since my last garden update. The sad news is that there will be no cherries at all this year, the birds have eaten them all. Also the raspberries disappeared while I was away on holiday, good thing I managed to pick my precious three small containers of them before they flew off the bush so to say. The courgettes are in high season and the first tomatoes are starting to turn red. The cucumber plant is also in full production. Outside, the onions are coming along, and the broccoli plants have been protected by netting. The herbs are already overgrown for the most part and would need some serious cutting down. The tarragon in particular is huge, and I don't quite know what to do with it. Planning to try some tarragon chicken but other than that I'm at a loss. 


The Culinary Consultant constructed netting to protect the broccoli from birds.
Lots of these!
And one of these (so far)
The tomatoes are trying to make their way to freedom.
Cucumbers are doing well. How they manage to support the cucumbers mid-air is a mystery for me.
Lettuce is finally big enough so that the slugs can't reach the top leaves.
The black currants are getting there. I can already see them in a jam jar.
And the current selection of flowers in the garden.


Sunday 6 July 2014

When life gives you courgettes - make ratatouille


When I came home from holiday, I found two bad boys waiting for me in the fridge. And by that I mean two humongous courgettes. What else is a girl to do than make ratatouille? Also, eating a bit lighter is a great idea after my one week of all inclusive all day buffet holiday... We had hardly finished breakfast (you know, just a bit of scrambled eggs and bacon, maybe a fried egg as well, followed by a round of croissants and finished off with some donuts, slices of pineapple and watermelon) when it was lunchtime (although I admit we didn't make it to lunch every day as we were still digesting breakfast). And then came dinnertime with a full buffet of salads, cold cut meats, grilled fish and meats with all sorts of sides you could imagine, maybe a bit of pizza on the side, then the light round of cheese and crackers followed by dessert of fruits and small cakes and maybe to finish, you know just to cool off a bit, some chocolate ice cream with chocolate syrup and sprinkles). All this to keep us fuelled for a busy day of lying on the beach, reading a book or maybe even walking along the beach with our toes in the wet sand. But that is all over now. So hence the need for a bit of ratatouille. And what could be better now that the garden is starting to produce some ratatouille ingredients. Looking at the number of courgette plants, I better start coming up with some more recipes soon.


Apparently the secret to a good ratatouille (according to Delia, and who am I to argue) is that your veggies need to be chopped into large enough chunks so they don't turn into mush when cooking, but retain their shape. I loosely used Delia's ratatouille recipe as a rough guide, although I did make some alterations, and used whatever veggies I happened to have around. This makes quite a big batch, so we had some for dinner, I popped a bit in the freezer and took some with me to work for lunch.

InvisiblePinkRatatouille (serves 4-6):
1 large courgette
2 medium aubergines
13 medium tomatoes (because that's what I happened to have in the fridge)
2 onions
2 cloves of garlic
1 red pepper
1 yellow pepper
2 tbsp olive oil
salt and pepper
fresh thyme and basil
3 tbsp tomato puree

The howto:
Roughly cut your courgette and aubergines into large chunks, place into a colander, sprinkle generously with salt, and mix. Weigh them down with a few plates or something else appropriate and leave for an hour or two to drain. This will remove the bitter taste from the aubergines, and also remove liquid to keep the ratatouille from becoming soggy. In the meanwhile, peel the skins of the tomatoes. This is easiest if you score a little cross on the bottom of the tomato with a sharp knife, then dip the tomato in cooking water for about 30 seconds or so, and then submerge in ice cold water. You can then easily peel off the skin. Remove the tomato seeds, and cut the tomato flesh into rough chunks (I cut them in half, removed the seeds and left them that size). Also, roughly chop your onions into chunks, as well as the peppers. Finely chop the garlic.

When the courgettes and aubergines have drained, rinse off the salt in cold water, and pat them dry with a clean towel or kitchen roll. Heat the olive oil in a large saucepan to medium heat and add the onions. Cook the onion until starting to soften. Then add the chopped garlic and cook for another minute or so. Add the courgettes and aubergines along with chopped thyme and basil (I just eyeballed it, but I think I used about 2 tbsp of fresh finely chopped basil ann 1 tbsp fresh thyme leaves) with a bit of salt and pepper. Let cook for about 10 minutes. Add the red peppers and tomatoes, add the tomato puree, give it a good stir and let cook for another 10-15 minutes. The veggies should not be mushy, but keep their colour and shape, and the cooking time will depend on the size of your veggie chunks. Taste and adjust salt and pepper. I rarely use salt in my food, but here I think it helps bring out the flavour of the veg. Serve as a side with meat, or as a veggie main on it's own.

The verdict:
I know ratatouille purists will say you shouldn't put tomato puree in it, and I'm not sure if these are the correct proportions of ingredients. But it turned out really nice, and it was even better the next day. I used quite a bit of thyme, so if you are not a huge fan, just reduce the amount a bit. I know some ratatouille recipes add sugar, but I don't think it was needed. This is such a simple, healthy and beautifully colourful food, and you can adjust it to include/exclude whichever veggies you like/have in the garden.

Wednesday 2 July 2014

Cape Verde and the island of Sal

This won't be much of a food review, just a few thoughts on my holiday in Cape Verde. I have split it into two parts, so more thoughts and photos will follow later on.

I have to admit that when my colleague travelled to CV a few months back I had no idea where the country was located and had to Wikipedia it (yes, if "to google" is a verb, then so is "to Wikipedia"). CV is a group of ten islands (nine of them inhabited) located off the Senegalese coast, and only a three and a half hour flight from Brazil. It gained its independence from Portugal in 1975 and hence the official language is Portugese. At home people speak Creole, a mix of Portugese, Spanish, English and French. Kids learn English in school and as tourism is the main field of employment you will find almost everyone you need to communicate with know English.


Not hard to imagine why many people call it the "New Caribbean"

The island with the most tourists is Sal, one of the islands with the long white sand beaches. This is also where we visited. The island got its name from the salt that was being produced here in the old volcano crater on the island, and over 40,000 tons of salt used to be exported all over the world. Now there is only very small scale production for local use. The salt mines are a tourist attraction and you can go floating in the salt pools which have 26 times the concentration of salt compared to sea water. When you get out and dry off, you skin will feel like sandpaper from all the crystallised salt, it's rather unbelievable.


The salt mines in the volcano crater. The scaffolding used to support the cable car
that transported the salt from the mine to the nearby small harbour.
The reason to come here is the sea, which some people have said is as amazing as the sea in the Caribbean. Tourists come for the white sand beaches and turquoise sea, or to do watersports. Conditions are ideal for windsurfing, kite surfing and scuba diving, particularly in the winter when winds are stronger whereas summer is low season. The rest of the island is rather barren (think of Luke Skywalker's home planet in Star Wars), although if you come around August you can see the hoards of turtles that come to the beaches to lay their eggs in the sand. Unfortunately, we visited just before the main turtle season. It seems like the island is rather protective of its turtles, with restricted beaches and big signs urging you to only join the official turtle tours to minimise the impact on the lives of these lovely animals.


There is over 8 km of white sand beaches on Sal.
Most tourists stay in a few main hotel resorts which are all inclusive, have their own pools and beaches, so there is no need to ever leave the little oasis that is you resort. And there really isn't that many places to go, the two cities on the island are Espargos, the capital, and Santa Maria in the south. The island has around 20,000 inhabitants with 14,000 of them living in Espargos as the locals can't afford to live in Santa Maria, which is essentially a tourist town. Small minibuses shuttle the locals back and forth between the two cities.


View over Espargos, the island's capital, from the hill that the city is built around.
If you come here, you should definitely do a tour of the island. The travel agencies offer their tours, but you get a much better deal if you go with a local guide (well, I didn't do both tours so I can't compare, but at least financially the local tours are a much better deal). You can find the local guides on the beach outside the main resorts, and they will try to sell you their tours very aggressively. If you get stressed by the aggressive marketing, just pick a tour and go at the beginning of your holiday, they do keep good track of who have already been on a tour and will stop harassing you after that.


View of the Sleeping Lion mountains.
We ended up choosing the No Stress tour run by brothers Dilan and Ola, and were very happy with our tour. It seems like all the tours have more or less the same stops, but our tour seemed to outlast the others as we could see some of the other tour cars heading back to the hotel much earlier than we did. You will get a guided tour all around he island with a local guide, our guide was born and raised on Sal. Just one hint, although it seems tempting to sit out on the back of the truck, I suggest you sit inside. Everything worth seeing can be seen and photographed during the stops, you will be protected from the sun and particularly the omnipresent dust and best of all you will have your guide available at all times to answer any questions you may have. I really liked that our guide was very honest in his answers, talking about the good and bad things and showing us all of the island, the natural beauty and also the poor parts. During the tour you will see the sleeping lion mountains, the shark cove with a very high chance of seeing the lemon sharks, the fishing village of Palmeira, the Buracona or Blue Eye (if the sun is shining and you get there before noon), the island capital Espargos, the salt mines and much more. Our tour lasted from 9.30 am to about 4.30 pm which for €25 (and an added €5 for the salt baths) was a rather good deal.


Buracona, or The Blue Eye that is visible when the sun hits a deep well of sea water. It is very striking as you peer down a deep dark well, and once you lean far enough over the edge it comes to view.

Lemon sharks. You could walk almost right up to the sharks in the shallow water.

Part 2 to follow in a few days with more pictures and a few words on the local cuisine.